How to Perform Seven Temporomandibular Joint Dislocation Reduction Techniques
August 24, 2022
Written by Nickolas Srica
Spoon Feed
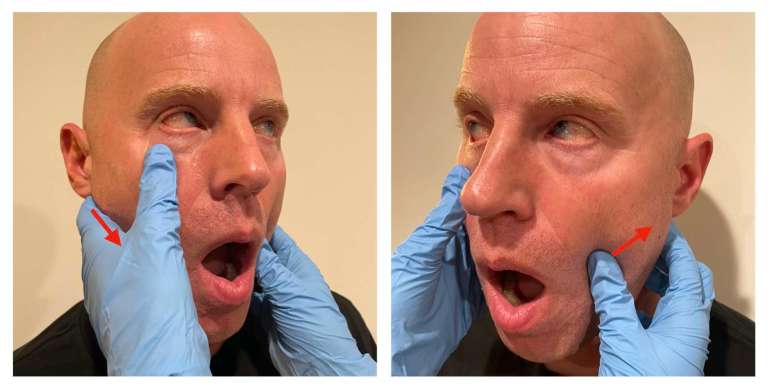
This article covers temporomandibular joint (TMJ) dislocations and 7 high-yield reduction techniques we should all know to best care for these patients in the ED. See reduction photos below.
Why does this matter?
TMJ dislocations – particularly anterior dislocations – which are the focus of this review, present commonly to the ED and have an estimated incidence of about 25 per 100,000 people per year. How to diagnose and manage this condition is extremely important for any ED provider to know, especially if you want to provide truly jaw-dropping care for your patients.
Did you hear about the guy who dislocated his jaw? I think he just did it for the atten-chin…
Assessment & Imaging
TMJ dislocations are often fairly obvious clinically, and if atraumatic in nature with a clear mechanism, imaging may not be necessary before reduction. If a traumatic mechanism or concern for underlying fracture, consider maxillofacial CT (or plain films if CT is limited).
Analgesia & Anesthesia
Controlling both pain and muscle spasm are the keys to success. Procedural sedation is often not required (though very well may be), so consider IV analgesia, IV anxiolysis, and even intra-articular injection of local anesthetic first to facilitate reduction.
Reduction Techniques
Traditional Bimanual Technique:
One of the more popular techniques – Stand in front of the seated patient with their mouth open and place both of your thumbs inside their mouth (preferably with your thumbs wrapped in gauze to protect from biting) along the lower molars as far posteriorly as possible with your other fingers outside the mouth along the angle of the mandible, then apply downward and backward pressure.

Wrist Pivot:
Sit and face the patient. Place your thumbs under the patient’s chin to apply upward pressure and place your index/middle fingers on their bilateral lower molars to apply downward pressure while pivoting your wrists in an ulnar direction.

Extraoral Technique:
Sit facing your seated patient. With one hand, place your thumb on the malar eminence of the maxilla/zygoma with the other fingers wrapped around the posterior mandible to stabilize the midface and pull forward. With your other hand, place your thumb on the displaced coronoid process to apply posterior pressure with the other fingers wrapped around the mastoid process.

Ipsilateral Approach:
This one can be done via an intraoral method, an extraoral method, or a combination of the two. For extraoral, place your thumb on the condyle of the mandible and apply downward pressure while stabilizing the head with your other hand. For intraoral, it’s just like the traditional bimanual technique, but you only perform it on the one side (or you can use both of your thumbs intraorally on one side to apply downward pressure in the “unified hands” technique). You can also use one hand to perform the extraoral technique and the other hand on the ipsilateral side to perform the intraoral technique, and voila, you have the combined technique.

Gag Reflex:
This one is exactly what it sounds like. You use something like a tongue depressor to stimulate the patient’s gag reflex to cause the muscles to contract to help relocate the mandible. The obvious risks of vomiting and potential aspiration make this one a bit less appealing to me.
Editor’s note: No way you’re getting a picture of me gagging. ~Clay
Lever Technique:
Place a 3-cm diameter roll of gauze in the posterior aspect of the patient’s mouth near their third molar, then push upward on the mentum using the gauze as a lever to rock the mandible posteriorly and back into place.

Syringe Method:
Ask the patient to gently bite down on a 5- or 10-mL syringe after placing it posteriorly between their upper and lower molars, then ask them to roll the syringe back and forth between their teeth. I personally have tried this technique a handful (mouthful?) of times and have not had much success, but I’m sure it works great for many others! I tend to start off with this one since it’s so easy to try.

Disposition & Aftercare
After reduction, always assess for complications and possible recurrent dislocation, and consider post-reduction imaging if unsure. Apply a bandage around the head and mandible to try and prevent recurrence. If unsuccessful, consider oral and maxillofacial specialist consultation, but if successful (I believe in you), tell your patient to celebrate by going to see OMFS in the clinic within 2-3 days for follow up!
Editor’s note: We didn’t want to use the pictures from the actual article, so we threw in these goofy ones. You’ll want to read the full text of this article an Annals of Emergency Medicine, linked below. Thanks to my daughters for assistance and photography expertise! ~Clay Smith
Source
Managing Temporomandibular Joint Dislocations. Ann Emerg Med. 2022 July. doi: 10.1016/j.annemergmed.2022.05.031.

